Archive
Microsoft Project Tutorial Part 22 – Planning an agile project
Yes, I wasn’t supposed to do this just yet, but since the number 1 request after the last post was just how I use project during an agile Project, here goes.
1. Fix the settings
Tools—>Options is the first place to go. I start with the calendar settings setting a focus factor. In the example below, I use a 25 hour working week:
I then move on to the Schedule tab and change assignment unit to Decimal and Duration to Weeks. Default task type should be Fixed duration (without effort driven) or Fixed Work, depending of what you like but here I use Fixed Duration.
I move on to the Calculation tab and deselect Updating task status updates resource status:
I confirm with OK and move to Tools—>Change Working time.
This dialog box works differently in different versions of Microsoft Project. In one of my previous posts, I described it as it works in version up until 2003. In version 2007 you select the Work Weeks tab and click Details.
Select all working days, Set day(s) to these specific working times: and the time you specified in Tools—>Options.
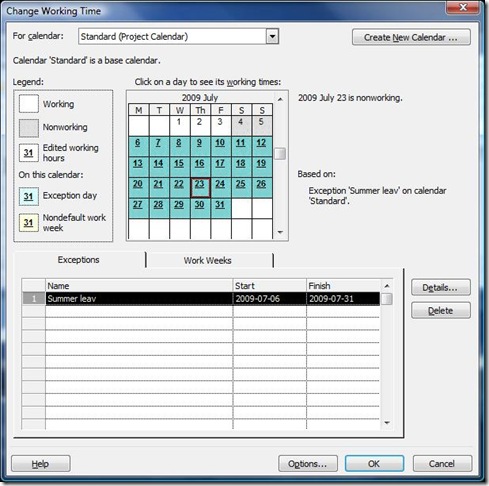
Add other holidays and free time. In Project 2007 you add a new exception, specify dates and click Details. There you can specify that these times are non working. (I think the new dialog box in 2007 is really confusing so make sure that the days are really off. It should look something like this before you click OK:
Then I double click the time scale and set the Middle Tier:
And the Bottom Tier:
Click OK.
Then I select Format—>Grid lines and set Gantt rows and Bottom Tier column as dotted:
I insert the column Work and now I have a Gantt chart which looks something like this:
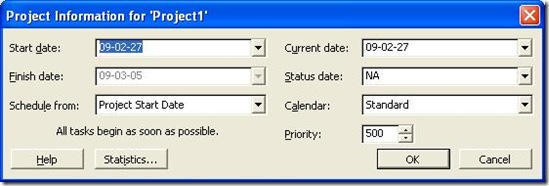
I set the Project Start under Project—>Project Information:
Confirm with OK.
If I just want to make a simple plan, I just enter the sprints and add the sprint length in Duration:
I then link the sprints to each other (for example by dragging the bars to the next sprint:
You then move on to the Resource sheet which you can find under the View menu.
Here you enter your resources and now you see why you changed the metric for units: instead of talking percentage you specify how many guys you have of each type. Of course you can enter names here instead. I do so when different resources are available during different parts of the project.
I can now for each sprint plan how many resources are working on each sprint by returning to the Gantt chart. I click ![]() , select a sprint and enter how many resources are available during that sprint:
, select a sprint and enter how many resources are available during that sprint:
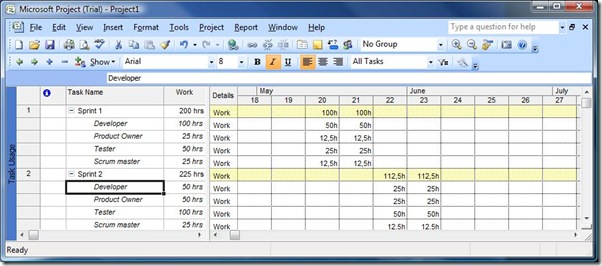
The result looks something like this. As you can see I can see how many man hours we can count on during each sprint and this gives you an idea of how velocity might fluctuate due to resource changes.
Now I can update status, take out reports, etc on a project level. For example using the Task Usage view:
Or the resource usage view:
Observe that you can right click the chart part of these views and add Baseline values and Actual values if you wish to view or update this.
But during the sprints then? Well, I use other tools then in the form of TFS and the Scrum dashboard based on Conchango Work item template. I have no need to track this double, so I don’t use the Project integration. Project is good for planning and follow up plans, not for keeping requirements or priorities,
If I’d used Project during the sprints, I would create a new project file for each sprint and insert hyperlinks between the files. Just so I focus on that sprint and don’t mix up the metrics.
And this is the full extent of my using Project in an agile project. The usage of the calendar functions makes it easy to calculate how much man hours we have available and since I use the Gantt chart form, it is easier to show the stuff for managers.
Yes, you still have the risk that “add a new resource late in the project” looks great in the calculations, but that is up to me to debate with the stakeholders. To make them understand the logic and the effects.
Microsoft Project Tutorial Part 21 – Splitting tasks
Sometimes you realize during a project that you need to split a task. So how do you go about that? Well, like with everything i Microsoft Project, it depends. So, I’m going to show you two alternatives.
We start with the following Project:
We have two tasks, of which one was added after we saved baseline.
If we view the Resource Usage view, we can see the planned work:
OK! Let’s do some splitting. We return to the Gantt Chart view and hit the Split task butcon: ![]()
We move the cursor to one of the tasks in the Gantt chart and voilâ, we get some help with our splitting:
Click where you want the split to begin. The result will be something like this:
You can now drag the right part of the task bar to specify how big gap you want. But what did really happen? Well, to see that we move back to the resource usage view:
Can you see what happened? 8h work was moved from that Thursday to the Monday about a week later.
So, what is keeping you from doing this manually in the Resource view? Well, actually nothing but when you do this manually, you need to have a look at the total sum in the Work column. But below I create a split in task B by moving some hours from Thursday and Friday to the coming week:
When we return to the Gantt chart we can see that it looks exactly the same (besides me creating a longer gap manually:
How do you remove a split in a task? Well, one method is to take the right bar and drag it to the left. Or you can start adding some numbers to the dates with 0:s in the Resource Usage view.
But now we move on the other, fundamentally different method of creating splits.
The previous method only works when you want to stop the work between two specific dates but it does not help you if you want to add a task in the gap and that the gap depends on the length of that task. So, here goes.
First, I add two new tasks between task A and B. The easiest way to do this is to select a field on row two and hit the INSERT button. I call the new tasks A1 and A2. The next thing I do is that I make the specifications for these two new parts. That is, I specify length and add resources.
Next thing I do is that I set the Units of Bobs assignment on Task A as 0%. The reason for me not removing the assignment is that I have a baseline value, and I don’t want to lose this history (a previous blog post discusses deletion specific)
I then select tasks A1 and A2 and click ![]() . Your plan should right now look something like this:
. Your plan should right now look something like this:
And now you can go ahead and start linking. I Link task A1 to B and B to A2. The result will look something like this:
In other words, you have created a split and you can now select to hide the sub tasks. But if you do so, you will not see the split in Task A. To accomplish this you select Tasks A1 and A2 and click the ![]() butcon.
butcon.
Make sure not to change anything else but that Roll up Gantt bar to Summery is selected:
The result will look something like this:
Well, now you can see the split, but that black bar doesn’t look nice. So we double click Task A and select Hide Task Bar. Observe that Show rolled up Gantt bars is what makes the sub tasks visible on this row so if you have a problems when sub tasks are visible or not visible on a summery task this can be a good place to look.
Now things should look like this:
But it really looks best if you hide the sub tasks for Task A:
This ends another series on how to use Microsoft Project and I’ll wait for a while before adding more posts on the subject but if you have a favorite topic which you want me to cover, please get back to me. Otherwise, I’m considering how I use Project when planning for scrum projects.
Microsoft Project Tutorial Part 18 – Ways to mess up your history
I covered this very briefly during one of my posts about Microsoft Project, but I cannot stress this enough: Don’t delete ANYTHING when you’ve started your project. So here goes; an example why deleting is really bad for you.
We start with this simple project. And again, I skip the focus factor. You should never ignore this in an actual project, but for this example it is of no consequence.
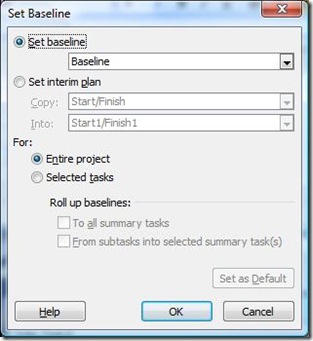
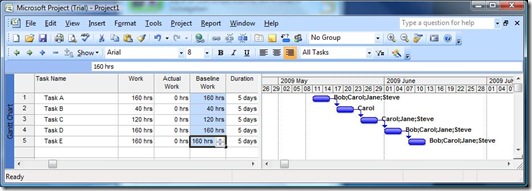
When the project starts, we save a Baseline by selecting Tools—>Tracking—>Save/Set Baseline.
What happens when you confirm is that all your values (Duration, Start, Finish, Cost Work, etc) concerning Tasks and Assignments are copied to a column with the same name but with a starting Baseline label. That is; Work is copied to Baseline Work. As in the example below:
You can change the values in the Baseline Columns by yourself since they are editable and the only thing the command does is saving you a lot of hassle copying the information to the right column.
But remember that you don’t save anything. There is no snapshot. All you get is a new value in another column. This is probably why Microsoft changed the command name from Save Baseline to Set Baseline. But people are probably still fooled by this.
Because what happens when you delete a row? I hate to tell you folks this but the baseline is deleted too. Don’t believe me? Well, it is so. Yes, if I look at the project statistics for the whole project and the remaining tasks, I can see the copied values, but I cannot see what made the changes. And now I go ahead and delete task D:
No warnings, no prompting. But I can no where see that there was a task D. Yes, the sums on a project level shows something happened but what was removed has been deleted.
So, never delete a task after you’ve started tracking with a baseline. But you are not safe with not deleting tasks. You must never delete assignments either for the same reason. Here goes an example of this. I’ve split the screen and right clicked the form and selected Resource Work:
And now I go ahead and delete the assignment of Jane. No prompts but afterwards I can compare the individual Baseline values for the remaining assignments and see that the sum for the task does not add up anymore:
So what do you do with those tasks you don’t need anymore or changes assignments. What you can do is remove all dependencies, move them to the bottom row, use a user defined field to specify that the task or the assignment is obsolete.
Here you can see a “removed” assignment, that is I’ve set the number of planned work hours to 0 for Steve. And now I can see that we planned for 40 hours, but this is not the current plan:
Makes a little bit more sense, doesn’t it?










Recent Comments